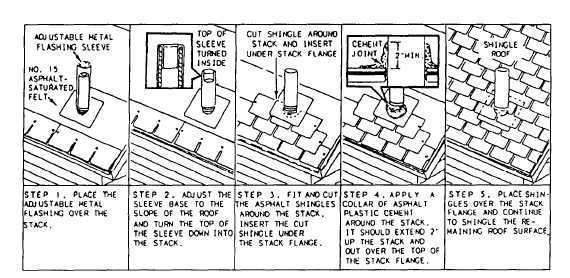
Figure 3-17.-Flashing around a roof projection.
As you approach a soil stack, apply the roofing up
to the stack and cut it to fit (fig. 3-17). You then install
a corrosion-resistant metal sleeve, which slips over the
stack and has an adjustable flange to fit the slope of the
roof. Continue shingling over the flange. Cut the
shingles to fit around the stack and press them firmly
into the cement.
The open or closed method can be used to construct
valley flashing. A valley underpayment strip of 15-pound
asphalt- saturated felt, 36 inches wide, is applied first.
The strip is centered in the valley and secured with
enough nails to hold it in place. The horizontal courses
of underlayment are cut to overlap this valley strip a
minimum of 6 inches.
Open valleys can be flashed with metal or with
90-pound mineral-surfaced asphalt roll roofing. The
color can match or contrast with the roof shingles. An
18-inch-wide strip of mineral-surfaced roll rooting is
placed over the valley underpayment. It is centered in the
valley with the surfaced side down and the lower edge
cut to conform to and be flush with the cave flashing.
When it is necessary to splice the material, the ends of
the upper segments are laid to overlap the lower
segments 12 inches and are secured with asphalt plastic
cement. This method is shown in figure 3-18. Only
enough nails are used 1 inch in from each edge to hold
the strip smoothly in place.
Another 36-inch-wide strip is placed over the first
strip. It is centered in the valley with the surfaced side
up and secured with nails. It is lapped the same way as
the underlying 18-inch strip.
Before shingles are applied, a chalk line is snapped
on each side of the valley. These lines should start 6
inches apart at the ridge and spread wider apart (at the
rate of 1/8 inch per foot) to the eave (fig. 3-18). The
Figure 3-18.-Open valley flashing using roll roofing.
chalk lines serve as a guide in trimming the shingle units
to fit the valley and ensure a clean, sharp edge. The upper
corner of each end shingle is clipped to direct water into
the valley and prevent water penetration between
courses. Each shingle is cemented to the valley lining
with asphalt cement to ensure a tight seal. No exposed
nails should appear along the valley flashing.
Closed (woven) valleys can be used only with strip
shingles. This method has the advantage of doubling the
coverage of the shingles throughout the length of the
valley. This increases the weather resistance at this
vulnerable point. A valley lining made from a
36-inch-wide strip of 55-pound (or heavier) roll roofing
is placed over the valley underpayment and centered in
the valley (fig. 3-19).
Valley shingles are laid over the lining by either of
two methods:
3-16