building (see fig. 9-5). Prop the frame on two saw-
horses and attach tag lines to assist in raising the ridge.
Raise the frame and brace it up with the A-frames. The
end frames are erected in a similar manner, except that
they are held in position by installing purlins and girts.
BRACE RODS.— After all sidewall girts, cave
girts, and base angles have been installed, install the
brace rods. Look at figure 9-6. First, attach brace rod
clips to the floor. Then, insert the end of the brace rod
down through the hole in the sidewall girt. Connect
the top end through the cave girt and the cave girt clip.
Finally, connect the bottom end through the clip on
the floor.
As soon as the four brace rods are in position, use
them to plumb the building. To plumb the rigid frame,
tighten or loosen the rod nuts at the brace rod clips to
adjust the column to plumb condition. Don’t forget:
When you tighten one side, the other side must be
loosened.
To make sure you are installing the end-wall mem-
bers correctly, snap a chalk line across the building,
using one edge of the columns for positioning the line.
Mark the center of the building on this line. Then, drop
a plumb bob from the center of the joint of the roof
beams at the ridge, with the line over the same side of
the roof beam as the chalk line. Adjust the frame so
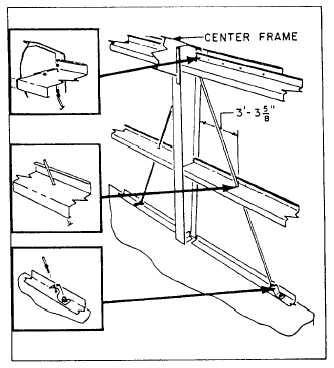
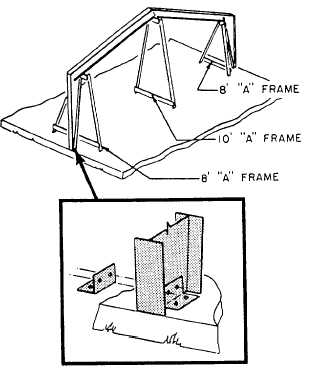
Figure 9-5.-Frame erection with A-frame props.
Figure 9-6.-Installing brace rods.
the plumb bob is directly over the center mark. Brace
the roof beam in this position until the roof panels are
in place.
EXTERIOR WALLS.— Uncrate exterior panels
and distribute them near where they will be used. First,
separate and place panels for each end wall. Place
full-length wall panels for each comer. Centrally
locate lower and upper sidewall panels and above and
below window panels, along each side of the building.
Place roof and ridge panels in stacks of eight each on
the floor. Make sure you fashion all joints properly.
Next, tighten all fasteners using metal-backed
neoprene washers with all roof fasteners and with all
shoulder bolts in the sidewalls. Then, properly apply
black mastic or sealant to all roof panel side laps and
end laps.
Start paneling the end wall at one comer and work
across to the other comer. Install the comer panel,
locating the bottom of the panel over the first two
shoulder bolts in the base angle. Use a level to plumb
this panel with the other shoulder bolts located at the
center of the corrugations. Locate the “below window
panel” over the base angle shoulder bolts, and impale
over the shoulder bolts. Remove the panel and reinstall
it so that it underlaps the first panel by pulling out on
the corrugated edge of the first panel.
9-5