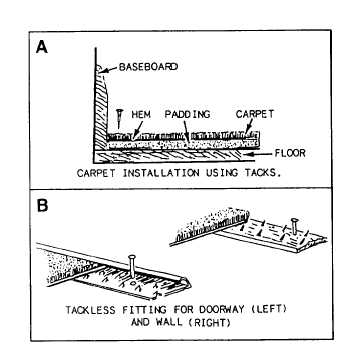
Figure 6-11.—Carpet installation.
Stone or concrete floors that have surface ridges or
cracks should be treated beforehand with a
floor-leveling compound to reduce carpet wear. These
liquid compounds are also useful for sealing the surface
of dusty or powdery floors. A thin layer of the
compound, which is floated over the floor, will keep dust
from working its way up through the underpayment and
into the carpet pile.
The best carpeting for concrete and hard tile
surfaces is the indoor-outdoor type. The backing of this
carpet is made of a closed-pore type of either latex or
vinyl foam, which keeps out most moisture. It is not wise
to lay any of the standard paddings on top of floor tiles
unless the room is well ventilated and free of
condensation. Vinyl and asbestos floor tiles accumulate
moisture when carpeting is laid over them. This
condensation soaks through into the carpet and
eventually causes a musty odor. It can also produce
mildew stains.
Fastening Carpets
The standard fastening methods are with tacks or by
means of tackless fittings. Carpets can also be loose-hid
with only a few tacks at entrances. Carpet tack lengths
are 3/4 and 1 inch. The first is long enough to go through
a folded carpet hem and anchor it firmly to the floor (fig.
6-11, view A). The 1-inch tacks are used in corners
where the folds of the hem make three thicknesses.
Tackless fittings (fig. 6-11, view B) are a convenient
fastening method. They consist of a 4-foot wooden
batten with a number of spikes projecting at a 60° angle.
The battens are nailed to the floor around the entire
room, end to end and 1/4 inch from the baseboard, with
the spikes facing toward the wall. The spikes grip the
backing of the carpet to hold it in place. On stone or
concrete floors, the battens are glued in place with
special adhesives.
Though cushion-backed carpeting can stay in place
without fastening, securing with double-face tape is the
preferred method. Carpets can also be attached to the
floor with Velcro™ tape where the frequent
removability of the carpet for cleaning and maintenance
is a factor.
Carpet Installation
To install a carpet, you will need a hammer, large
scissors, a sharp knife, a 3-foot rule, needle and carpet
thread, chalk and chalk line, latex adhesive, and carpet
tape. The only specialized tool you will need is a carpet
stretcher, often called a knee-kicker.
Before starting the job, remove all furniture and any
doors that swing into the room. When cutting the carpet,
spread it out on a suitable floor space and chalk the exact
pattern of the room on the pile surface; then cut along
the chalk line with the scissors or sharp knife.
Join unseamed carpet by placing the two pieces so
the pile surfaces meet edge to edge. Match patterned
carpets carefully. With plain carpets, lay each piece so
the piles run the same way. Join the pieces with carpet
thread, taking stitches at 18-inch intervals along the
seam. Pull the carpet tight after each stitch to take up
slack. Sew along the seam between stitches. Tuck any
protruding fibers back into the pile. Carpet can also be
seamed by cementing carpet tape to the backing threads
with latex adhesive.
Open the carpet to room length and position it
before starting to putdown the padding. The pile should
fall away from windows to avoid uneven shading in
daylight. Fold one end of the carpet back halfway and
put the padding down on the exposed part of the floor.
Do the same at the other end. This avoids wrinkles
caused by movement of the padding.
To tack start at the corner of the room that is formed
by the two walls with the fewest obstructions. Butt the
carpet up against the wall, leaving about 1 1/2 inches up
the baseboard for hemming. Attach the carpet
temporarily with tacks about 6 inches from the
baseboard along these two walls. Use the knee-kicker to
stretch the carpet, first along the length, then the width,
Start from the middle of the wall, stretching alternately
toward opposite comers. When it is smooth, tack down
the stretched area temporarily.
6-9