Figure 3-50.-Dimensioning of welds.

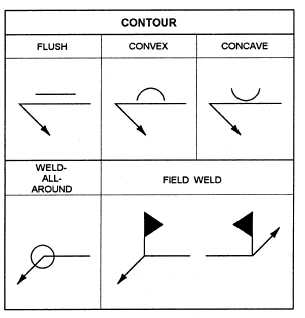
Figure 3-51.-Supplementary symbols.
Figure 3-50 shows the meaning of various welding dimension symbols. Notice that the size of a weld is shown on the left side of the weld symbol (fig. 3-50, view A). The length and pitch of a fillet weld are indicated on the right side of the weld symbol. View B shows a tee joint with 2-inch intermittent fillet welds that are 5 inches apart, on center. The size of a groove weld is shown in view C. Both sides are 1/2 inch, but note that the 60-degree groove is on the other side of the joint and the 45-degree groove is on the arrow side.
Supplementary Symbols
In addition to basic weld symbols, a set of supplementary symbols may be added to a welding symbol. Some of the most common supplementary symbols are shown in figure 3-51.
Contour symbols are used with weld symbols to show how the face of the weld is to be formed. In addition to contour symbols, finish symbols are used to indicate the method to use for forming the contour of the weld.
When a finish symbol is used, it shows the method of finish, not the degree of finish; for example, a C is used to indicate finish by chipping, an M means machining, and a G indicates grinding. Figure 3-52 shows how contour and finish symbols are applied to a weldng symbol. This figure shows that the weld is to be ground flush. Also, notice that the symbols are placed on the same side of the reference line as the weld symbol.
Continue Reading