Grinding, by removing metal from the face, makes the valve stem extend through the head more. This affects spring tension and rocker-arm geometry. Grind the face of the valve as little as possible. A sharp valve margin (fig. 3-58) indicates excessive valve face removal and requires valve replacement. If the margin is too thin, the valve can burn when returned to service. It may not be thick enough to dissipate heat fast enough. The head of the valve can actually begin to melt, burn, and blow out the exhaust port. Refer to the manufacturer's manual for specifications about minimum valve margin of thickness.
If the head of the valve wobbles as it turns on the valve grinding machine, the valve is either bent or chucked improperly. Turn off the machine and check for causes. If the valve is bent, replace it with a new one.
If a burned valve is not noticed during initial inspection, it will show up when excess grinding is required to clean up the valve face. A normal amount of grinding does not remove a deep pit or groove. Replace the valve if it is burned.
Another area on the valve that must be attended to is the valve stem. This is due to wear from the valve operating mechanisms. When the tip end of the valve stems is rough, smooth them by grinding lightly with a special attachment furnished with the valve grinding machine. Grind as little off the stem as possible. Many stems are hardened and too much grinding results in rapid wear when the valve is returned to service. Generally, cut the same amount of metal off the face and stem. This helps to keep the valve train geometry correct.
Valve Guide Service
Servicing of valve guides is an important, but often neglected, part of a good valve job. The guide must be clean and in good condition before a good valve seat can be made. Valve guide wear is a common problem; it allows the valve to move sideways in its guide during operation. This can cause oil consumption (oil leaks past the valve seal and through the guide), burned valves (poor seat to valve face seal), or valve breakage.
There are several satisfactory methods of checking for valve guide wear. One procedure for checking valve guide wear is to slide the valve into its guide. Full it open approximately 1/2 inch, then try and wiggle the valve sideways. If the valve moves sideways in any direction, the guide or stem is worn Another checking procedure involves the use of a small hole gauge to measure the inside of the guide and a micrometer to measure the valve stem; the difference in the readings is the clearance. Check the manufacturer's manual for the maximum allowable clearance. When the maximum clearance is exceeded the valve guide needs further servicing before you proceed with the rest of the job.
Servicing procedures depend on whether the guide is of the integral or replaceable type. If it is the integral type, it must be reamed to a larger size and a valve with an oversize stem installed. But if it is replaceable, it should be removed and a new guide installed
KNURLING of the valve guides has become more popular as a method of compensating for wear of the valve guides. Knurling is accomplished by attaching a special tool to an electric drill and inserting the tool in the worn guide. This method is not recommended if the guide has been worn excessively or knurled previously.
Valve guides should be removed and replaced with special drivers (fig. 3-59). When working on a valve in the cylinder head of an engine, you may use an arbor press to remove and replace the valve guides.
After the valve guides are serviced and the valve seats are ground, check the concentricity of the two with a valve seat dial indicator (fig. 3-60). Any irregularity in the seat will register on this dial.
Valve Seat Service
Valve seat service requires either replacement of the seat or reconditioning of the seat by grinding or cutting. Valve seat replacement is required when a valve seat is cracked, burned, or recessed (sunk) in the cylinder head Normally, valve seats can be machined and returned to service.
To remove a replaceable pressed-in seat, split the old seat with a sharp chisel. Then pry out the old seat. New seat inserts should be chilled in dry ice for about 15 minutes to shrink them, so they can be driven into place easily. The seat expands when returned to room temperature, which locks the seat in place.
In most cases, the valve seats are not replaceable, so they must be ground (fig. 3-61). Before operating the valve seat grinding equipment in your shop, be sure to study the manufacturer's manual for specific
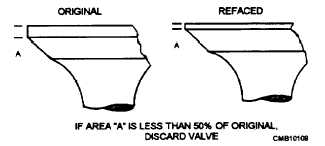
Figure 3-58. - Proper valve margin of thickness after refacing.
Continue Reading