includes full-width metal subjambs into which the upper
and lower sash slide, replacing the parting strip. Stops
are located against these instead of the sash to provide
a small amount of pressure. The apron is cut to a length
equal to the outer width of the casing line (fig. 6-35, view
A). It should be nailed to the windowsill and to the 2-
by 4-inch framing sill below.
When casing is used to finish the bottom of the
window frame, as well as the sides and top, the narrow
stool butts against the side window jamb. Casing should
then be mitered at the bottom comers (fig. 6-35, view
B) and nailed as previously described.
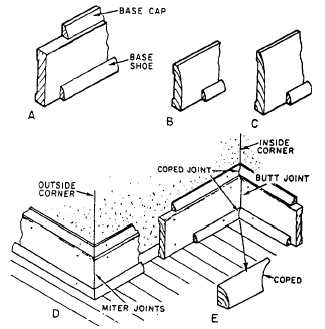
BASE MOLDING
Base molding serves as a finish between the finished
wall and floor. It is available in several widths and
forms. Two-piece base consists of a baseboard topped
with a small base cap (fig. 6-36, view A). When plaster
is not straight and true, the small base molding will
conform more closely to the variations than will the
wider base alone. A common size for this type of
baseboard is 5/8 inch by 3 1/4 inches or wider. One-piece
base varies in size from 7/16 inch by 2 1/4 inches to
1/2 inch by 3 1/4 inches and wider (fig. 6-36, views B
and C). Although a baseboard is desirable at the junction
of the wall and carpeting to serve as a protective bumper,
wood trim is sometimes eliminated entirely.
Figure 6-36.-Base moldings.
Most baseboards are finished with a 1/2-by 3/4-inch
base shoe (fig. 6-36, view A). A single base molding
without the shoe is sometimes placed at the wall-floor
junction, especially where carpeting might be used.
Square-edged baseboard should be installed with a
butt joint at the inside comers and a mitered joint at the
outside comers (fig. 6-36, view D). It should be nailed
to each stud with two 8d finishing nails. Molded
single-piece base, base moldings, and base shoe should
have a coped joint at the inside corners and a mitered
joint at the outside corners. In a coped joint, the first
piece is square-cut against the plaster or base and the
second piece of molding coped. This is done by sawing
a 45° miter cut and using a coping saw to trim the
molding along the inner line of the miter (fig. 6-36, view
E). The base shoe should be nailed into the baseboard
itself. Then, if there is a small amount of shrinkage of
the joists, no opening will occur under the shoe.
To butt-join a piece of baseboard to another piece
already in place at an inside corner, set the piece to be
joined in position on the floor, bring the end against or
near the face of the other piece, and take off the line of
the face with a scriber (fig. 6-37). Use the same
procedure when butting ends of the baseboard against
the side casings of the doors.
For miter-joining at an outside comer, proceed as
shown in figure 6-38. First, set a marker piece of
baseboard across the wall comer, as shown view A, and
mark the floor along the edge of the piece. Then set the
piece to be mitered in place. Mark the point where the
wall corner intersects the top edge and the point where
Figure 6-37.-Butt-joining baseboard at inside corners.
6-24