Figure 3-19.-Closed valley flashing.
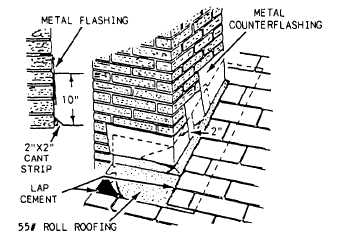
Figure 3-20.-Flashing around a chimney.
They can be applied on both roof surfaces at the
same time with each course, in turn, woven over
the valley.
Each surface can be covered to the point
approximately 36 inches from the center of the
valley and the valley shingles woven in place
later.
In either case, the first course at the valley is laid
along the eaves of one surface over the valley lining and
extended along the adjoining roof surface for a distance
of at least 12 inches. The first course of the adjoining
roof surface is then carried over the valley on top of the
previously applied shingle. Succeeding courses are then
laid alternately, weaving the valley shingles over each
other.
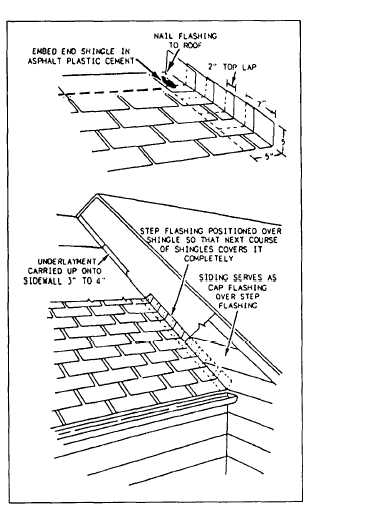
Figure 3-21.-Step flashing.
The shingles are pressed tightly into the valley and
nailed in the usual manner. No nail should be located
closer than 6 inches to the valley center line, and two
nails should be used at the end of each terminal strip.
As you approach a chimney, apply the shingles over
the felt up to the chimney face. If 90-pound roll roofing
is to be used for flashing, cut wood cant strips and install
them above and at the sides of the chimney (fig. 3-20).
The roll roofing flashing should be cut to run 10 inches
up the chimney. Working from the bottom up, fit metal
counterflashing over the base flashing and insert it
1 1/2 inches into the mortar joints. Refill the joints with
mortar or roofing cement. The counterflashing can also
be installed when the chimney masonry work is done,
Where the roof intersects a vertical wall, it is best to
install metal flashing shingles. They should be 10 inches
long and 2 inches wider than the exposed face of the
regular shingles. The 10-inch length is bent so that it will
extend 5 inches over the roof and 5 inches up the wall
(see figure 3-21). Apply metal flashing with each
3-17