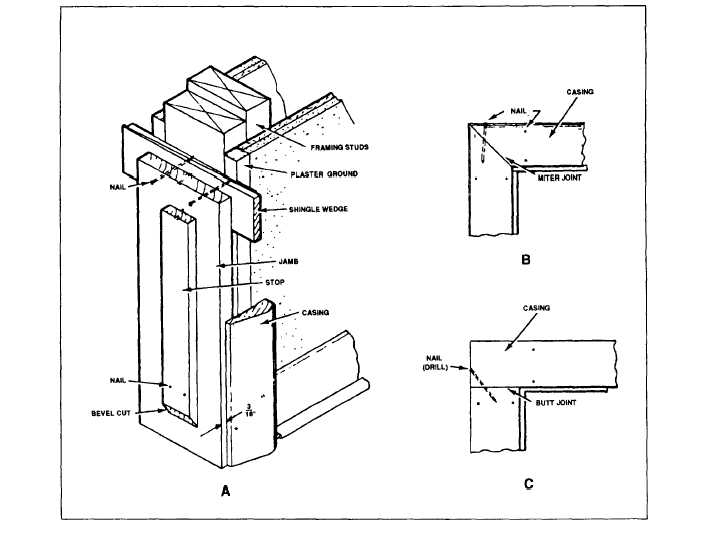
Figure 6-26.—Doorframe and trim.
wedged area one driven so that the doorstop covers it.
The opposite side jamb is then fastened in place with
shingle wedges and finishing nails, using the first jamb
as a guide in keeping a uniform width.
Casings should be nailed to both the jamb and the
framing members. You should allow about a 3/16-inch
edge distance from the face of the jamb. Use 6d or 7d
finish or casing nails, depending on the thickness of the
casing. To nail into the stud, use 4d or 5d finish nails or
1 1/2-inch brads to fasten the timer edge of the casing
to the jamb. For hardwood casing, it is advisable to
predrill to prevent splitting. Nails in the casing should
be located in pairs and spaced about 16 inches apart
along the full height of the opening at the head jamb.
Casing with any form of molded shape must have a
mitered joint at the comers (fig. 6-26, view B). When
casing is square-edged, a butt joint maybe made at the
junction of the side and head casing (fig. 6-26, view C),
If the moisture content of the casing material is high, a
mitered joint may open slightly at the outer edge as the
material dries. This can be minimized by using a small
glued spline at the corner of the mitered joint. Actually,
use of a spline joint under any moisture condition is
considered good practice, and some prefitted jamb,
door, and casing units are provided with splined joints.
Nailing into the joint after drilling helps retain a close
fit.
The door opening is now complete except for fitting
and securing the hardware and nailing the stops in
proper position. Interior doors are normally hung with
two 3 1/2-by 3 1/2-inch loose-pin butt hinges. The door
is fitted into the opening with the clearances shown in
6-17