4.
5.
6.
7.
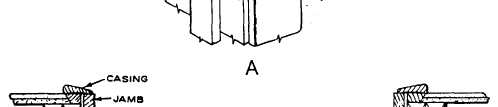
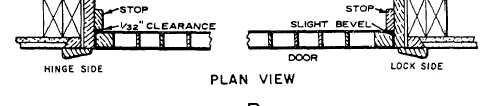
Figure 6-32.—Door details.
Drill the holes through the face of the door and
then the hole through the edge to receive the
latch bolt. It should be slightly deeper than the
length of the bolt.
Cut again for the latch-bolt mounting plate, and
install the latch unit.
Install the interior and exterior knobs.
Find the position of the strike plate and install it
in the jamb.
Strike Plates
The strike plate, which is routed into the doorjamb,
holds the door in place by contact with the latch. To
install, mark the location of the latch on the doorjamb
and locate the position of the strike plate by outlining it.
Rout out the marked outline with a chisel and also rout
for the latch (fig. 6-32, view A). The strike plate should
be flush with or slightly below the face of the doorjamb.
When the door is latched, its face should be flush with
the edge of the jamb.
Doorstops
The stops that have been temporarily set during the
fitting of the door and the hardware may now be nailed
in permanently. You should use finish nails or brads,
1 1/2 inches long. The stop at the lock side (fig. 6-32,
view B) should be nailed first, setting it tight against the
door face when the door is latched. Space the nails in
pairs 16 inches apart.
The stop behind the hinge side should be nailed
next, and a 1/32-inch clearance from the door face
should be allowed to prevent scraping as the door is
opened. The head-jamb stop should then be nailed in
place. Remember that when the door and trim are
painted, some of the clearance will be taken up.
6-21