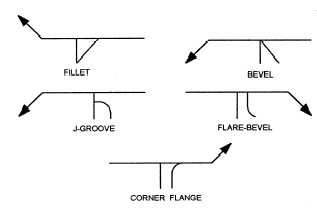
Figure 3-45. - Weld symbols applied to reference line.

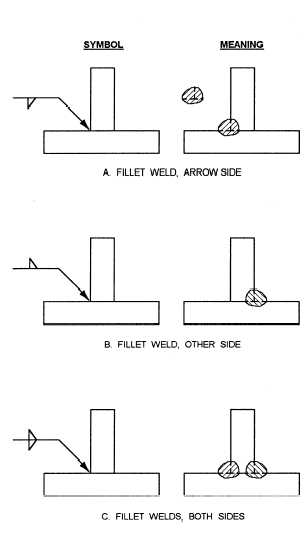
Figure 3-46. - Specifying weld locations.

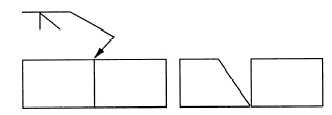
Figure 3-47. - Arrowhead indicates beveled plate.
symbol is only part of the information required in the welding symbol. The term welding symbol refers to the total symbol, which includes all information needed to specify the weld(s) required.
Figure 3-45 shows how a weld symbol is applied to the reference line. Notice that the vertical leg of the weld symbol is shown drawn to the left of the slanted leg. Regardless of whether the symbol is for a fillet, bevel, J-groove, or flare-bevel weld, the vertical leg is always drawn to the left.
Figure 3-46 shows the significance of the positions of the weld symbols position on the reference line. In view A the weld symbol is on the lower side of the reference line that is termed the arrow side. View B shows a weld symbol on the upper side of the reference line that is termed the other side. When weld symbols are placed on both sides of the reference line, welds must be made on both sides of the joint (view C).
When only one edge of a joint is to be beveled, it is necessary to show which member is to be beveled. When such a joint is specified, the arrow of the welding symbol points with a definite break toward the member to be beveled. This is shown in figure 3-47.
Figure 3-48 shows other elements that may be added to a welding symbol. The information applied to the reference line on a welding symbol is read from left to right regardless of the direction of the arrow.
Dimensioning
In figure 3-48, notice there are designated locations for the size, length, pitch (center-to-center spacing), groove angle, and root opening of a weld. These locations are determined by the side of the reference line on which the weld symbol is placed. Figure 3-49 shows how dimensions are applied to symbols.
Continue Reading