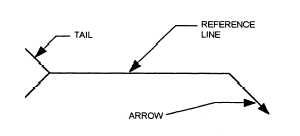
Figure 3-43.-Standard welding symbol.
six views (top, front, left side, right side, back, and bottom). Most objects, such as the steel part shown in figure 3-41, can be sufficiently described using three views: top, front, and right side. For the object shown in figure 3-41, orthographic drawings of the top, front, and right-side views are shown in figure 3-42.
Notice the placement of the views shown in figure 3-42. This is a standard practice that you should be aware of when reading orthographic drawings. By this standard practice, the top view is always placed above the front view and the right-side view is placed to the right of the front view. When additional views are needed, the left side is always drawn to the left of the front view and the bottom is drawn below the front view. Placement of the back view is somewhat flexible; however, it is usually drawn to the left of the left-side view. When reading and understanding the different orthographic views, you find it is sometimes helpful to prepare a pictorial sketch. You can find a discussion of sketching in Blueprint Reading and Sketching, NAVEDTRA 10077-F1 .
Think of drawings as a form of communication. They are intended to help you understand all the necessary information you need to fabricate and assemble an object regardless of the complexity. It is important that you learn to read drawings.
Handling and Care of Drawings
Special care should be exercised in the handling of drawings. When they are not being used, keep them on a rack or in another assigned place of storage. Drawings are valuable, and they may be difficult or impossible to replace if they are lost or damaged.
Now, we will discuss some special symbols. These are symbols a welder must be able to read and to understand how they are used to convey information.
WELDING SYMBOLS
Special symbols are used on a drawing to specify where welds are to be located, the type of joint to be used, as well as the size and amount of weld metal to be deposited in the joint. These symbols have been standardized by the American Welding Society (AWS). You will come into contact with these symbols anytime you do a welding job from a set of blueprints. You need to have a working knowledge of the basic weld symbols and the standard location of all the elements of a welding symbol.
A standard welding symbol (fig. 3-43) consists of a reference line, an arrow, and a tail. The reference line becomes the foundation of the welding symbol. It is used to apply weld symbols, dimensions, and other data to the weld. The arrow simply connects the reference line to the joint or area to be welded. The direction of the arrow has no bearing on the significance of the reference line. The tail of the welding symbol is used only when necessary to include a specification, process, or other reference information.
Weld Symbols The term
weld symbol refers to the symbol for a specific type of weld. As discussed earlier, fillet, groove, surfacing, plug, and slot are all types of welds. Basic weld symbols are shown in figure 3-44. The weld

Figure 3-44.-Basic weld symbols.
Continue Reading