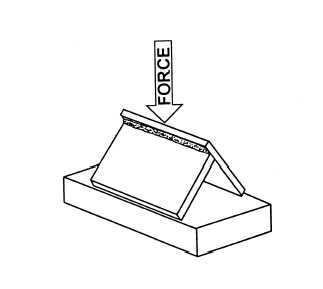
Figure 7-69. - Rupturing fillet weld test plate.
(fig. 7-69) until a break occurs in the joint. This force may be applied by hydraulics or hammer blows.
In addition to checking the fractured weld for soundness, now is a good time to etch the weld to check for cracks.
Etching Test
The ETCHING TEST is used to determine the soundness of a weld and also make visible the boundary between the base metal and the weld metal.
To accomplish the test, you must cut a test piece from the welded joint so it shows a complete transverse section of the weld. You can make the cut by either sawing or flame cutting. File the face of the cut and then polish it with grade 00 abrasive cloth. Now place the test piece in the etching solution.
The etching solutions generally used are hydrochloric acid, ammonium persulfate, iodine and potassium iodide, or nitric acid. Each solution highlights different defects and areas of the weld. The hydrochloric acid dissolves slag inclusions and enlarges gas pockets, while nitric acid is used to show the refined zone as well as the metal zone.
Tensile Strength Test
The term TENSILE STRENGTH may be defined as the resistance to longitudinal stress or pull and is measured in pounds per square inch of cross section. Testing for tensile strength involves placing a weld sample in a tensile testing machine and pulling on the test sample until it breaks.

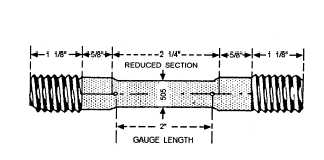
Figure 7-70. - Standard tensile test specimen.
The essential features of a tensile testing machine are the parts that pull the test specimen and the devices that measure the resistance of the test specimen. Another instrument, known as an extensometer or strain gauge, is also used to measure the strain in the test piece. Some equipment comes with a device that records and plots the stress-strain curve for a permanent record.
The tensile test is classified as a destructive test because the test specimen must be loaded or stressed until it fails. Because of the design of the test machine, weld samples must be machined to specific dimensions. This explains why the test is made on a standard specimen, rather than on the part itself. It is important that the test specimen represents the part. Not only must the specimen be given the same heat treatment as the part but it also must be heat-treated at the same time.
There are many standard types of tensile test specimens, and figure 7-70 shows one standard type of specimen commonly used. The standard test piece is an accurately machined specimen. Overall length is not a critical item, but the diameter and gauge length are. The 0.505-inch-diameter (0.2 square inch area) cross section of the reduced portion provides an easy factor to manipulate arithmetically. The 2-inch gauge length is the distance between strain-measuring points. This is the portion of the specimen where you attach the extensometer. In addition, you can use the gauge length to determine percent elongation.
The tensile test amounts to applying a smooth, steadily increasing load (or pull) on a test specimen and measuring the resistance of the specimen until it breaks. Even if recording equipment is not available, the testis not difficult to perform. During the test, you observe the behavior of the specimen and record the extensometer and gauge readings at regular intervals. After the specimen breaks and the fracturing load is recorded, you measure the specimen with calipers to determine the percent of elongation and the percent reduction in area. In addition, you should plot a stress-strain curve. From the data obtained, you can determine tensile strength,
Continue Reading