and if the gauge reading is equal to the pressure represented by the total weight added, the gauge is accurate. If the gauge is not accurate, it must be adjusted to read correctly.
ADJUSTING
When a Bourdon-tube pressure gauge is inaccurate, the following adjustments should be made:
1. If the pointer travels too far or not far enough as each weight is applied, change the ratio of movement between the Bourdon tube and the pointer. The movement of the sector gear meshes with a pinion on the pointer spindle. Lengthening the distance between the spindle and the link connection to the sector gear reduces the amount of travel to the pointer. Shortening this distance increases the amount of travel.
2. If the amount of travel is correct as each weight is added but the total reading is wrong, the pointer must be reset. Gauges of recent design have a countersunk split-head screw in the dial for setting the pointer. On some older types of gauges, the pointer must be pulled and reset. Pointer pullers are supplied with the gauge- testing apparatus.
3. If the gauge cannot be made to read correctly over the entire scale, it should be adjusted so the reading is correct at the working pressure. A table or curve should then be made that shows the corrections required for other readings.
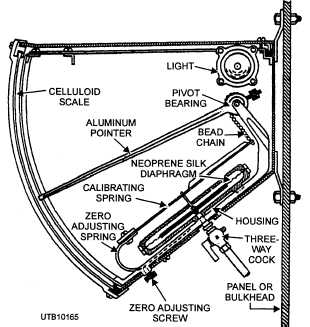
From time to time, you may be required to adjust the diaphragm type of air pressure gauge, as shown in figure 5-56. The zero adjustment on these gauges should be checked frequently. Each gauge of this type has a three-way cock that can be turned to shut off the gauge without disconnecting the gauge piping. When the handle of the three-way cock is at right angles to the valve body, the gauge unit is open to the outside air pressure, and the reading on the scale should be zero. When the handle of the cock is parallel to the valve body, the gauge is open to the pressure in the line. A zero adjusting screw is provided either below the gauge or on one side of the gauge. Turn this screw in or out to bring the pointer to zero while the handle of the three-way cock is at right angles to the valve body. After making this zero adjustment, restore the gauge to service by turning the cock handle so it is again parallel with the valve body.

Figure 5-56. - Diaphragm type of pressure gauge.
REPAIRING
If you are required to replace any part of a pressure gauge, handle the mechanism carefully so none of the elements are bent or distorted.
You may occasionally have to replace the diaphragm in a diaphragm type of air pressure gauge (fig. 5-56). First, disconnect the pressure line below the unit. Remove the outside zero adjustment screw and the three-way cock (with its coupling), and remove the unit from its case.
Disassemble the unit by compressing the small spring on top of the calibrating spring to loosen the retaining pin. Remove the stem that holds the calibrating spring, and remove the screws (usually 10) around the edge of the diaphragm housing. The oil diaphragm can then be lifted out.
Clean both surfaces of the housing. Apply a small amount of gasket cement to the edge of the lower housing, and immediately place the new diaphragm- gasket assembly over the edge of the lower housing. Replace the top housing. Tighten the screws, being careful to draw them up uniformly. Replace the calibrating spring stem, compress the spring, and insert the retaining pin in the stem. Then replace the unit in the case. The gauge is ready for service.
Q27. On a deadweight tester, what is used to apply pressure to the gauge for testing?
Q28. What type of gauge has a zero adjusting screw?
Continue Reading