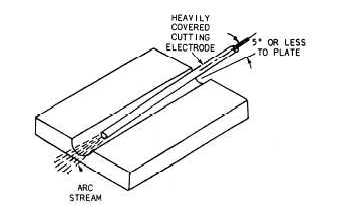
Figure 7-57. - Gouge-cutting operation using a solid core arc- cutting electrode.
WELDING QUALITY CONTROL
In the fabrication or repair of equipment, tests are used to determine the quality and soundness of the welds. Many different tests have been designed for specific faults. The type of test used depends upon the requirements of the welds and the availability of testing equipment. In this section, nondestructive and destructive testing are briefly discussed.
NONDESTRUCTIVE TESTING
Nondestructive testing is a method of testing that does not destroy or impair the usefulness of a welded item. These tests disclose all of the common internal and surface defects that can occur when improper welding procedures are used. A large choice of testing devices is available and most of them are easier to use than the destructive methods, especially when working on large and expensive items.
Visual Inspection
Visual inspection is usually done automatically by the welder as he completes his welds. This is strictly a subjective type of inspection and usually there are no definite or rigid limits of acceptability. The welder may use templates for weld bead contour checks. Visual inspections are basically a comparison of finished welds with an accepted standard. This test is effective only when the visual qualities of a weld are the most important.
Magnetic Particle Inspection
Magnetic particle inspection is most effective for the detection of surface or near surface flaws in welds.

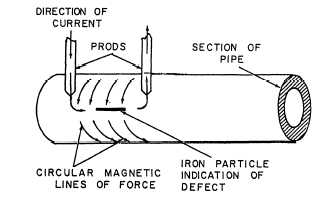
Figure 7-58. - Circular magnetization (prod method).

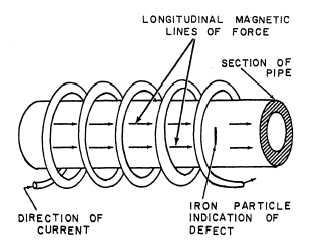
Figure 7-59. - Longitudinal magnetization (coil method).
It is used in metals or alloys in which you can induce magnetism. While the test piece is magnetized, a liquid containing finely ground iron powder is applied. As long as the magnetic field is not disturbed, the iron particles will form a regular pattern on the surface of the test piece. When the magnetic field is interrupted by a crack or some other defect in the metal, the pattern of the suspended ground metal also is interrupted. The particles of metal cluster around the defect, making it easy to locate.
You can magnetize the test piece by either having an electric current pass through it, as shown in figure 7-58, or by having an electric current pass through a coil of wire that surrounds the test piece, as shown in figure 7-59. When an electric current flows in a straight line from one contact point to the other, magnetic lines of
Continue Reading