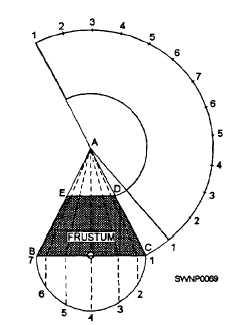
half-plan into an equal number of parts and number them as shown.
3. With vertex A as a center and with dividers, set a distance equal to AC and draw an arc for the stretch-out of the bottom of the cone.
4. Set the dividers equal to the distance of the step-offs on the half-plan and step off twice as many spaces on the arcs as on the half-plan; number the step-offs 1 to 7 to 1, as shown in the illustration (fig. 2-52).
5. Draw lines connecting A with point 1 at each end of the stretch-out. This arc, from 1 to 7 to 1, is equal in length to the circumference of the bottom of the cone.
6. Now, using A for a center, set your dividers along line AC to the length of AD. Scribe an arc through both of the lines drawn from A to 1.
The area enclosed between the large and small arcs and the number 1 line is the pattern for the frustum of a cone. Add allowance for seaming and edging and your stretch-out is complete.
TRIANGULAR DEVELOPMENT
Triangulation is slower and more difficult than parallel line or radial line development, but it is more practical for many types of figures. Additionally, it is the only method by which the developments of warped surfaces may be estimated. In development by triangulation, the piece is divided into a series of

Figure 2-52. - Radial line development of a frustum of a cone.
triangles as in radial Line development. However, there is no one single apex for the triangles. The problem becomes one of finding the true lengths of the varying oblique lines. This is usually done by drawing a true, length diagram.
An example of layout using triangulation is the development of a transition piece.
The steps in the triangulation of a warped transition piece joining a large, square duct and a small, round duct are shown in figure 2-53. The steps are as follows:
1. Draw the top and front orthographic views (view A, fig. 2-53).
2. Divide the circle in the top view into a number of equal spaces and connect the division points with AD (taken from the top part of view D, fig. 2-53) from point A. This completes one fourth of the development. Since the piece is symmetrical, the remainder of the development may be constructed using the lengths from the first part.
It is difficult to keep the entire development perfectly symmetrical when it is built up from small triangles. Therefore, you may check the overall symmetry by constructing perpendicular bisectors of AB, BC, CD, and DA (view E, fig. 2-53) and converging at point O. From point O, swing arcs a and b. Arc a should pass through the numbered points, and arc b should pass through the lettered points.
FABRICATION OF EDGES, JOINTS, SEAMS, AND NOTCHES
There are numerous types of edges, joints, seams, and notches used to join sheet-metal work. We will discuss those that are most often used.
Edges
Edges are formed to enhance the appearance of the work, to strengthen the piece, and to eliminate the cutting hazard of the raw edge. The kind of edge that you use on any job will be determined by the purpose, by the sire, and by the strength of the edge needed.
The SINGLE-HEM EDGE is shown in figure 2-54. This edge can be made in any width. In general, the heavier the metal, the wider the hem is made. The allowance for the hem is equal to its width (W in fig. 2-54).
Continue Reading