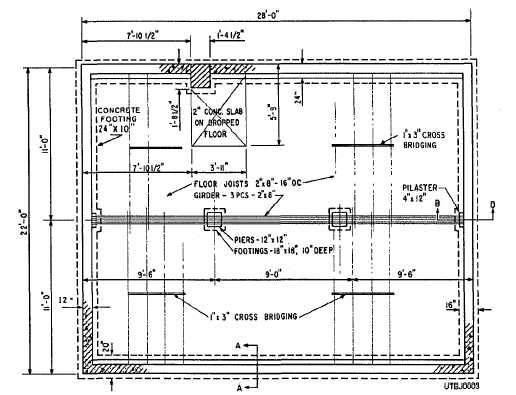
Figure 1-3. - Structural or foundation plan.
should work directly from the jobsite plans or working drawings, so the finished job is done properly and complies with the plans.
The chief parts of a mechanical plan are the views of the fixtures and equipment and the layout and details of the system. Plans also contain written information in the title block; the scales; the lines, symbols, and abbreviations; the print notes; the revision block; the drawing, reference, and zone numbers; and the bill of material. All of these areas are covered in detail in Blueprint Reading and Sketching, NAVEDTRA 12014.
Q1. In Seabee construction, a complete set of blueprints consists of how many plans?
Q2. The plans normally used by Seabees in construction are created by whom?
Q3. If you wanted to know the height of an exterior wall of a structure, to what section of the plans should you refer?
Q4. On the jobsite, you will work from what type of plans?
ISOMETRIC SKETCHING
LEARNING OBJECTIVE: Recognize and develop isometric drawings.
You may not be able to sketch or draw objects exactly as they should look or as a two-dimensional orthographic picture. However, with the aid of some basic rules and practice, you can learn to draw an isometric sketch.
PURPOSE OF THE ISOMETRIC DRAWING
The purpose of an isometric drawing is to show a three-dimensional picture in one drawing. It resembles a picture without the artistic details. Many Utilitiesmen have difficulty in visualizing a piping installation clearly when they are working from a floor plan to an elevation drawing and back again. The isometric drawing combines the floor plan and the elevation. It clearly shows the details and the relationship of the pipes in a piping installation.
Normally, isometric drawings are NOT drawn to scale on blueprints; however, when you sketch out an 1-4
Continue Reading