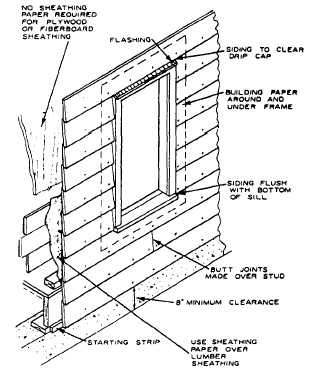
Figure 4-3.-Installation of bevel siding.
Exposure
The minimum lap for bevel siding is 1 inch. The
average exposure distance is usually determined by the
distance from the underside of the window sill to the top
of the drip cap (fig. 4-3). From the standpoint of weather
resistance and appearance, the butt edge of the first
course of siding above the window should coincide with
the top of the window drip cap. In many one-story
structures with an overhang, this course of siding is
often replaced with a frieze board It is also desirable
that the bottom of a siding course be flush with the
underside of the window sill. However, this may not
always be possible because of varying window heights
and types that might be used in a structure.
One system used to determine the siding exposure
width so that it is approximately equal above and below
the window sill is as follows:
1. Divide the overall height of the window frame
by the approximate recommended exposure
distance for the siding used (4 inches for
6-inch-wide siding, 6 inches for 8-inch-wide
siding, 8 inches for 10-inch-wide siding, and 10
inches for 12-inch-wide siding). This result will
be the number of courses between the top and
the bottom of the window. For example, the
overall height of our sample window from the
2.
top of the drip cap to the bottom of the sill is
61 inches. If 12-inch-wide siding is used, the
number of courses would be 61/10 = 6.1, or six
courses. To obtain the exact exposure distance,
divide 61 by 6 and the result would be 10 1/6
inches.
Determine the exposure distance from the
bottom of the sill to just below the top of the
foundation wall. If this distance is 31 inches, use
three courses of 10 1/3 inches each. Thus, the
exposure distance above and below the window
would be almost the same (fig. 4-3).
When this system is not satisfactory because of big
differences in the two areas, it is preferable to use an
equal exposure distance for the entire wall height and
notch the siding at the window sill. The fit should be
tight to prevent moisture from entering.
Installation
Siding may be installed starting with a bottom
course. It is normally blocked out with a starting strip
the same thickness as the top of the siding board (fig.
4-3). Each succeeding course overlaps the upper edge
of the course below it. Siding should be nailed to each
stud or on 16-inch centers. When plywood, wood
sheathing, or spaced wood nailing strips are used over
nonwood sheathing, 7d or 8d nails may be used for
3/4-inch-thick siding. However, if gypsum or fiberboard
sheathing is used, 10d nails are recommended to
properly penetrate the stud For 1/2-inch-thick siding,
nails may be 1/4 inch shorter than those used for
3/4-inch siding.
The nails should be located far enough up from the
butt to miss the top of the lower siding course (fig. 4-4).
The clearance distance is usually 1/8 inch. This allows
for slight movement of the siding because of moisture
changes without causing splitting. Such an allowance is
especially required for the wider (8 to 12 inch) siding.
Joints
It is good construction practice to avoid butt joints
whenever possible. Use the longer sections of siding
under windows and other long stretches, and use the
shorter lengths for areas between windows and doors.
When a butt joint is necessary, it should be made over a
stud and staggered between courses.
Siding should be square cut to provide good joints.
Open joints permit moisture to enter and often lead to
paint deterioration. It is a good practice to brush or dip
4-4