three equal parts. Each short web meets the top chord at
a point that is one-fourth the horizontal distance of the
bottom chord.
FABRICATION
The construction features of a typical W-truss are
shown in figure 2-64. Also shown are gusset cutout sizes
and nailing patterns for nail-gluing. The span of this
truss is 26 feet and roof cut is 4/12. When spaced
24 inches apart and made of good- quality 2- by 4-inch
members, the trusses should be able to support a total
roof load of 40 pounds per square foot.
Gussets for light wood trusses are cut from 3/8- or
1/2-inch standard plywood with an exterior glue line, or
from sheathing-grade exterior plywood. Glue is spread
on the clean surfaces of the gussets and truss members.
Staples are used to supply pressure until the glue is set.
Under normal conditions and where the relative
humidity of air in attic spaces tends to be high, a
resorcinol glue is applied. In areas of low humidity, a
casein or similar glue is used. Two rows of 4d nails
are used for either the 3/8- or 1/2-inch-thick gusset. The
nails are spaced so that they are 3 inches apart and
3/4 inches from the edges of the truss members. Gussets
are nail-glued to both sides of the truss.
Plywood-gusset, king-post trusses are limited to
spans of 26 feet or less if spaced 24 inches apart and
fabricated with 2- by 4-inch members and a 4/12 roof
cut. The spans are somewhat less than those allowed for
W-trusses having the same-sized members. The shorter
span for the king-post truss is due, in part, to the
unsupported upper chord. On the other hand, because it
distances between connections are shorter, the W-truss
can span up to 32 feet without intermediate support, and
its members can be made of lower grade lumber.
INSTALLATION
Trusses are usually spaced 24 inches OC. They must
be lifted into place, fastened to the walls, and braced.
Small trusses can be placed by hand, using the procedure
shown in figure 2-69. Builders are required on the two
opposite walls to fasten the ends of the trusses. One or
two workers on the floor below can push the truss to an
upright position. If appropriate equipment is available,
use it to lift trusses into place.
In handling and storing completed trusses, avoid
placing unusual stresses on them. They were designed
to carry roof loads in a vertical position; thus it is
important that they be lifted and stored upright. If they
must be handled in a flat position, enough support
should be used along their length to minimize bending
deflections. Never support the trusses only at the center
or only at each end when they are in a flat position.
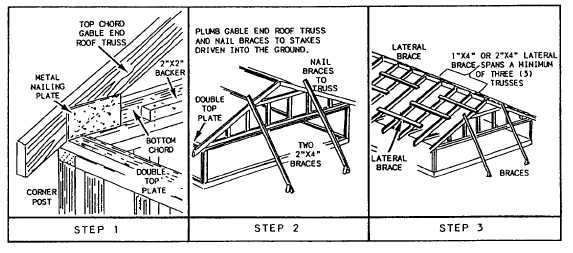
Bracing
After the truss bundles have been set on the walls,
they are moved individually into position, nailed down,
and temporarily braced. Without temporary bracing, a
truss may topple over, cause damage to the truss, and
possibly injure workers. A recommended procedure for
bracing trusses as they are being set in place is shown
in figure 2-70. Refer to the figure as you study the
has more members than the king-post truss and
following steps:
Figure 2-70.—Installing roof trusses and temporary bracing.
2-43