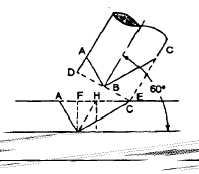
Figure 3-50. - Branch connections point.
Set the diameter FG on the blade of the square. Set and lock the protractor atone fourth of the number of degrees of turnaway from the header (in the example, 1/4 of 60° = 15°). With the blade along FG, the frost cutback measurement, FA, will be indicated on the tongue of the square. Measure off this distance along the center line of the header from line FG and mark point A. As described before, join point A with the points of intersection of line FG and the two side quarter lines to outline the first cut.
With the same protractor setting, flip the square and mark point H. Distance FH is equal to FA. FH is the first portion of the second cutback measurement. With the same settings and with the square upside down (as compared to before), locate point I the same way you located point H.
Now, set the protractor to one half of the number of degrees of turnaway from the header (in the example, 1/2 of 60° = 30°). With the blade set to the diameter, the second portion, HD, of the second cutback measurement will be indicated on the tongue. The second cutback measurement is the total distance FC. Connect points C and B and connect C with the point, which corresponds to B, on the quarter line on the opposite side of the header. This outlines the second cut and completes the marking of the header.
Use the same two cutback measurements to lay out the end of the branch. Branch cutback distance DA is equal to header cutback distance FA. Branch cutback distance EC is equal to header cutback distance FC. If the branch end is square, make cutback measurements from the end, rather than marking in a circumferential line. Make all cuts as before, and level and join the branch and header by welding.
WELDED TEE (BRANCH SMALLER THAN THE HEADER)
One of the best types of joint for a 90-degree branch connection where the branch is smaller than the header is obtained by inserting the smaller branch pipe through the wall down to the inner surface of the header. The outside surface of the branch intersects the inside surface of the header at all points. When the header is properly beveled this type of intersection presents a very desirable vee for welding. In ease templates or template dimensions are not available, the line of cut on both header and branch can be located by other methods, but the use of templates is recommended.
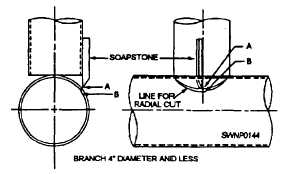
In the first method, the square end of the branch should be placed in the correct position against the header and the line of intersection marked with a flat soapstone pencil (fig. 3-51). Since radial cutting is used in this case and since the outer branch wall should intersect the inner header wall, point B should be located on both sides of the branch a distance from A equal to slightly more than the header wall thickness. A new line of cut is then marked as a smooth curve through the points, tapering to the first line at the top of the header. Following radial cutting, the joint should then be beveled
The branch should be slipped into the hole until even with point B to locate the line of cut on the branch. A soapstone pencil may then be used to mark the line for radial cutting. No beveling is necessary.
A second method for larger diameter pipe is shown in figure 3-52. After the centerlines have been drawn, the branch should be placed against the header, as shown. By means of a straightedge, the distance between A and the header wall is determined, and this measurement above the header is transferred to the branch wall, as represented by the curved line a-b-c.

Figure 3-51. - Method where the line of cut is first marked on main.
Continue Reading