TM 9-243
TYPES AND USES
RING GAGES
The plain ring gage is an external gage of circular form.
For sizes between 0.059 and 0.510 inch, ring gages are
made with a hardened bushing pressed into a soft body.
The thickness of the gage will range from 3/16 to 1-5/16
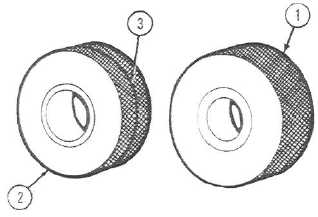
inches. On ring gages, the GO gage (1) is larger than the
NO GO gage (2). The GO and NO GO ring gages are
separate units. They can be distinguished from each
other by an annular groove (3) cut in the knurled outer
surface of the NO GO gage. Ring gages made for
diameters of 0.510 to 1.510 inches are the same as
those shown above, except there is no bushing; they are
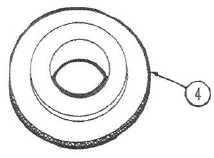
made all in one piece. Ring gages, sized from 1.510 to
5.510 inches are made with a flange (4). This design
reduces the weight, making the larger sizes easier to
handle.
Ring gages are used more often in the inspection of
finished parts than parts in process. The reason for this
is that the finished parts are usually readily accessible;
whereas, parts in a machine that are supported at both
ends would have to be removed to be checked.
SNAP GAGES
The plain snap gage is made in two general types, the
nonadjustable and adjustable.
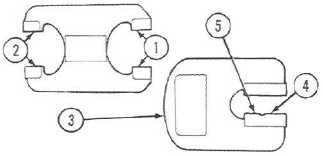
The nonadjustable type is a solid construction, having
two gaging members, GO (1) and NO GO (2) as shown
above. The part to be inspected is first tried on the GO
side and then the gage is reversed and the part tried on
the NO GO side. Some solid snap gages (3) have com-
bined gaging members in the same set of jaws as shown
above, known as a progressive snap gage. The outer
member (4) gages the GO dimension and the inner
member (5) the NO GO dimension.
Three standard designs of the adjustable type are avail-
able, consisting of a light, rigid frame with adjustable
gaging pins, buttons, or anvils. These pins or buttons
may be securely locked in place after adjustment, and
locking screws are tightened to hold the gaging dimen-
sions.
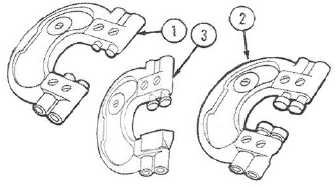
One type of adjustable snap gage is made in sizes that
range from 1/2 to 12 inches (1). It is equipped with four
gaging pins and is suitable for checking the dimension
between surfaces. Another type is made in sizes that
range from 1/2 to 11-1/4 inches (2). It is equipped with
four gaging buttons and is suitable for checking flat or
cylindrical work.
The third type is made in sizes from 1/2 to 11-5/8
inches (3). It is equipped with two gaging buttons and a
single block anvil, and is especially suitable for checking
the diameters of shafts, pins, studs, and hubs.
15-3

