TM 9-243
USING PRECISION GAGE BLOCKS - Continued
4
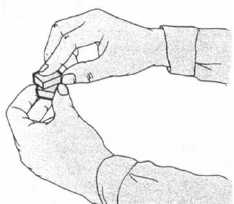
Shift gage blocks so that their sides are in line. Any
combination of gage blocks may be stacked
together in this manner. The combination will be as
solid as a single block.
NOTE
The adhesive force that binds two gage
blocks together is a combination of
molecular attraction and the suction cup
action due to the film of oil or moisture on
the surfaces wrung together.
Separate gage blocks by sliding them
apart, using the same movement as when
wringing them together.
2
Shift the blocks. If the blocks are clean, they will
CAUTION
begin to take hold.
Do not leave blocks wrung together for
3
Slide the two blocks together, using a slight pres-
long periods of time since surfaces in
sure and a rotary motion.
contact will tend to corrode.
FACTORS TO CONSIDER WHEN USING GAGE BLOCKS
Ordinary changes in temperature have a sizable effect
When using gage blocks consider the source of error
on measurements made with precision gage blocks.
resulting from temperature. Metals other than iron and
The standard measuring temperature is 68°F, which is
steel (such as aluminum) have a much different coeffi-
just a little lower than the average temperature in most
cient of linear expansion which will result in a difference
shops. Since the room temperature affects the work as
between the room temperature measurement and the
well as the block, the expansion in the work will be
standard measuring temperature measurement. Care-
matched in most cases by a similar expansion in the
less handling of gage blocks may produce an error of
block. The coefficient of linear expansion of several
several millionths of an inch and this error increases
metals and blocks is listed below:
proportionally with the dimension of the block.
Material
Steel
Iron
Phosphor bronze
Aluminum
Copper
Gage blocks
Millionths of an inch
5.5 to 7.2 per degree F
5.5 to 6.7
9.3
12.8
9.4
6.36 to 7.0
The temperature of the work may be either lower or
higher than the room temperature as a result of a
machining operation and this difference may be suffi-
cient to cause a sizable error.
Theoretically, the measuring pressure should increase
proportionally with the area of contact. For practical
purposes, it is better to use a standard measuring pres-
sure. The most commonly used pressure is 1/2 to 2
pounds.
Gage blocks are used in the layout and in checking the
accuracy of tools, dies, and fixtures. They are also used
in machine setups and in checking parts in process of
manufacture and finished parts.
Gage blocks are commonly used in setting adjustable
instruments and indicating gages and verifying inspec-
tion gages. Gage blocks are used to verify the accuracy
and wear of ring and snap gages and many other
special-purpose gages. The classification of blocks
depends largely on the accuracy required. Typical clas-
sification is shown on the following page.
Handle blocks only when they must be moved and hold
them between the tips of your fingers so that the area of
contact is small. Hold them for short periods of time only.
NOTE
Avoid conducting body heat into the block
by careless handling. Body heat may
raise the temperature of the block, caus-
ing a serious error in a measurement, par-
ticularly if a long stack of blocks is being
handled.
15-8


