for a window casing. Electrical boxes must also be
extended with box extensions or plaster rings.
Masonry surfaces must be smooth, clean, and dry.
Where the walls are below grade, apply a vapor barrier
of polyethylene (use mastic to attach it) and install the
furring strips. Use a power-actuated nail gun to attach
strips to the masonry. Follow all safety procedures. If
you hand nail, drive case-hardened nails into the mortar
joints. Wear goggles; these nails can fragment.
Most drywall blemishes are caused by structural
shifting or water damage. Correct any underlying
problems before attacking the symptoms.
Popped-up nails are easily fixed by pulling them out
or by dimpling them with a hammer. Test the entire wall
for springiness and add roils or screws where needed.
Within 2 inches of a popped-up nail, drive in another
nail. Spackle both when the spots are dry, then sand and
prime.
To repair cracks in drywall, cut back the edges of
the crack slightly to remove any crumbly gypsum and
to provide a good depression for a new filling of joint
compound. Feather the edges of the compound. When
dry, sand and prime them.
When a piece of drywall tape lifts, gently pull until
the piece rips free from the part that’s still well stuck.
Sand the area affected and apply anew bed of compound
for a replacement piece of tape. The self-sticking tape
mentioned earlier works well here. Feather all edges.
If a sharp object has dented the drywall, merely sand
around the cavity and fill it with spackling compound.
A larger hole (bigger than your fist) should have a
backing. One repair method is shown in figure 5-14.
First, cut the edges of the hole clean with a utility knife
(view A). The piece of backing should be somewhat
larger than the hole itself. Drill a small hole into the
middle of the backing piece and thread a piece of wire
into the hole. This wire allows you to hold the piece of
backing in place. Spread mastic around the edges of the
backing. When the adhesive is tacky, fit the backing
diagonally into the hole (view B) and, holding onto the
wire, pull the piece against the back side of the hole.
When the mastic is dry, push the wire back into the wall
cavity. The backing stays in place. Now, fill the hole with
plaster or joint compound (view C) and finish (view D).
(Note: This is just one of several options available for
repairing large surface damage to gypsum board.)
Compound sags in holes that are too big. If it
happens, mastic a replacement piece of drywall to the
backing piece. To avoid a bulge around the filled-in hole,
Figure 5-15.—Battens used for paneling joints.
feather the compound approximately 16 inches, or
more. If the original drywall is 1/2 inch thick use
3/8-inch plasterboard as a replacement on the backing
piece.
Holes larger than 8 inches should be cut back to the
centers of the nearest studs. Although you should have
no problem nailing a replacement piece to the studs, the
top and the bottom of the new piece must be backed. The
best way to install backing is to screw drywall gussets
(supports) to the back of the existing drywall. Then, put
the replacement piece in the hole and screw it to the
gussets.
PLYWOOD
Most of the plywood used for interior walls has a
factory-applied finish that is tough and durable.
Manufacturers can furnish prefinished matching
trim and molding that is also easy to apply.
Color-coordinated putty sticks are used to conceal nail
holes.
Joints between plywood sheets can be treated in a
number of ways. Some panels are fabricated with
machine-shaped edges that permit almost perfect joint
concealment. Usually, it is easier to accentuate the joints
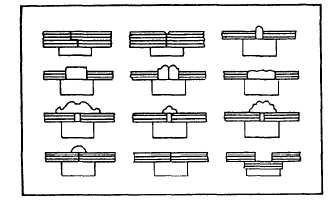
with grooves or use battens and strips. Some of the many
different styles of battens are shown in figure 5-15.
Before installation, the panels should become
adjusted (conditioned) to the temperature and humidity
of the room. Carefully remove prefinished plywood
from cartons and stack it horizontally. Place 1-inch
spacer strips between each pair of face-to-face panels.
Do this at least 48 hours before application.
Plan the layout carefully to reduce the amount of
cutting and the number of joints. It is important to align
5-13