Figure 5-10.—Finishing an inside corner.
When finishing an inside corner (fig. 5-10), cut your
tape the length of the corner angle you are going to
finish. Apply the joint compound with a 4-inch knife
evenly about 2 inches on each side of the angle. Use
sufficient compound to embed the tape. Fold the tape
along the center crease (view A) and firmly press it into
the corner. Use enough pressure to squeeze some
compound under the edges. Feather the compound 2
inches from the edge of the tape (view B). When the first
coat is dry, apply a second coat. A corner trowel (view
C) is almost indispensable for taping comers. Feather
the edges of the compound 1 1/2 inches beyond the first
coat. Apply a third coat if necessary, let it dry, and sand
it to a smooth surface. Use as little compound as possible
at the apex of the angle to prevent hairline cracking.
When molding is installed between the wall and ceiling
intersection, it is not necessary to tape the joint (view D).
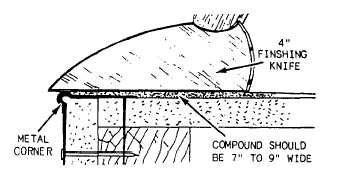
When finishing an outside corner (fig. 5-1 1), be sure
the corner bead is attached firmly. Using a 4-inch
finishing knife, spread the joint compound 3 to 4 inches
wide from the nose of the bead, covering the metal
edges. When the compound is completely dry, sand
lightly and apply a second coat, feathering edges 2 to 3
inches beyond the first coat. A third coat maybe needed,
depending on your coverage. Feather the edges of each
coat 2 or 3 inches beyond each preceding coat. Corner
beads are no problem if you apply compound with care
and scrape the excess clean. Nail holes and screw holes
usually can be covered in two passes, though shrinkage
sometimes necessitates three. A tool that works well for
sanding hard-to-reach places is a sanding block on an
extension pole; the block has a swivel-head joint.
Figure 5-11.—Finishing an outside corner.
5-10