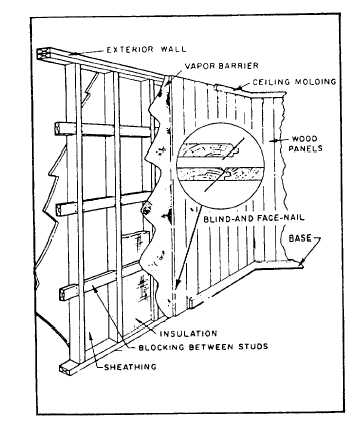
Figure 5-16.—Vertical wood paneling.
When solid wood paneling is applied horizontally,
furring strips are not required-the boards are nailed
directly to-the studs. Inside corners are formed by
butting the paneling units flush with the other walls. If
random widths are used, boards on adjacent walls must
match and be accurately aligned.
Vertical installations require furring strips at the top
and bottom of the wall and at various intermediate
spaces. Sometimes, 2- by 4-inch blocking is installed
between the studs to serve as a nailing base (see fig.
5-16). Even when heavy T&G boards are used, these
nailing members should not be spaced more than 24
inches apart.
Narrow widths (4 to 6 inches) of T&G paneling are
blind-nailed (see insert in fig. 5-16). The nailheads do
not appear on finished surfaces, and you eliminate the
need for countersinking and filling nail holes. This
nailing method also provides a smooth, blemish-free
surface. This is especially important when clear finishes
are used. Drive 6d finishing nails at a 45° angle into the
base of the tongue and on into the bearing point.
Carefully plumb the first piece installed and check for
the plumbness at regular intervals. For lumber paneling
(not tongue and grooved), use 6d casing or finishing
nails. Use two roils at each nailing member for panels
6 inches or less in width and three nails for wider panels.
Exterior wall constructions, where the interior
surface consists of solid wood paneling, should include
a tight application of building paper located close to the
backside of the boards. This prevents the infiltration of
wind and dust through the joints. In cold climates,
insulation and vapor barriers are important. Base,
corner and ceiling trim can be used for decorative
purposes or to conceal irregularities in joints.
SUSPENDED ACOUSTIC
CEILING SYSTEMS
LEARNING OBJECTIVE: Upon completing
this section, you should be able to identify the
materials used to install a suspended
acoustical ceiling and explain the methods of
installation.
Suspended acoustical ceiling systems can be
installed to lower a ceiling, finish off exposed joints,
cover damaged plaster, or make any room quieter and
brighter. The majority of the systems available are
primarily designed for acoustical control. However,
many manufacturers offer systems that integrate the
functions of lighting, air distribution, fire protection,
and acoustical control. Individual characteristics of
acoustical tiles, including sound-absorption co-
efficients, noise-reduction coefficients, light-reflection
values, flame resistance, and architectural applications,
are available from the manufacturer.
Tiles are available in 12-to 30-inch widths, 12-to
60-inch lengths, and 3/16- to 3/4-inch thicknesses. The
larger sizes are referred to as “panels.” The most
commonly used panels in suspended ceiling systems are
the standard 2-by 2-foot and 2- by 4-foot acoustic panels
composed of mineral or cellulose fibers.
It is beyond the scope of this training manual to
acquaint you with each of the suspended acoustical
ceiling systems in use today. Just as the components of
these systems vary according to manufacturers, so do
the procedures involved in their installation. With this
in mind, the following discussion is designed to acquaint
you with the principles involved in the installation of a
typical suspended acoustical ceiling system.
PREPARATION FOR INSTALLATION
The success of a suspended ceiling project, as with
any other construction project, is as dependent on
planning as it is on construction methods and
procedures. Planning, in this case, involves the selection
of a grid system (either steel or aluminum), the selection
and layout of a grid pattern, and the determination of
5-15