To give yourself the greatest number of decorating
options in the future, paint the finished drywall surface
with a coat of flat oil-base primer. Whether you intend
to wallpaper or paint with latex, oil-base primer adheres
best to the facing of the paper and seals it.
Renovation and Repair
For the best results, drywall should be flat against
the surface to which it is being attached. How flat the
nailing surface must be depends upon the desired finish
effect. Smooth painted surfaces with spotlights on them
require as nearly flawless a finish as you can attain.
Similarly, delicate wall coverings-particularly those
with close, regular patterns—accentuate pocks and
lumps underneath. Textured surfaces are much more
forgiving. In general, if adjacent nailing elements (studs,
and so forth) vary by more than 1/4 inch, buildup low
spots. Essentially, there are three ways to create a flat
nailing surface:
Frame out a new wall-a radical solution. If the
studs of partition walls are buckled and warped,
it’s often easier to rip the walls out and replace
them. Where the irregular surface is a load-
bearing wall, it maybe easier to build a new wall
within the old.
Cover imperfections with a layer of 3/8-inch
drywall. This thickness is flexible yet strong.
Drywall of 1/4-inch thickness may suffice.
Single-ply cover-up is a common renovation
strategy where existing walls are ungainly but
basically flat. Locate studs beforehand and use
screws long enough to penetrate studs and joists
at least 5/8 inch.
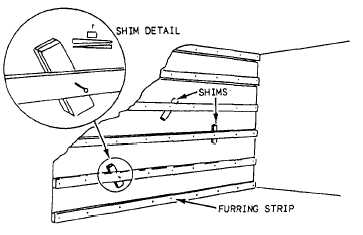
Build up the surface by “furring out.” In the
Figure 5-12.—Furring strips hacked with shims.
the center of each stud on the existing surface. Here too,
mark the depth of low spots.
The objective of this process is a flat plane of furring
strips over existing studs. Tack the strips in place and
add shims (wood shingles are best) at each low spot
marked (see fig. 5-12). To make sure a furring strip
doesn’t skew, use two shims, with their thin ends
reversed, at each point. Tack the shims in place and
plumb the furring strips again. When you are satisfied,
drive the nails or screws all the way in.
“furring- out” procedure, furring-strips 1 by 2
inches are used. Some drywall manufacturers,
however, consider that size too light for
attachment, favoring instead a nominal size of 2
by 2 inches. Whatever size strips you use, make
sure they (and the shims underneath) are
anchored solidly to the wall behind.
By stretching strings taut between diagonal comers,
you can get a quick idea of any irregularities in a wall.
If studs are exposed, further assess the situation with a
level held against a straight 2 by 4. Hold the straightedge
plumb in front of each stud and mark low spots every
12 inches or so. Using a builder’s crayon, write the depth
of each low spot, relative to the straightedge, on the stud.
If studs aren’t exposed, locate each stud by test drilling
and inserting a bent coat hanger into the hole. Chalk line
When attaching the finish sheets, use screws or nails
long enough to penetrate through furring strips and into
the studs behind. Strips directly over studs ensure the
strongest attachment. Where finish materials are not
sheets—for example, single-board vertical paneling—
furring should run perpendicular to the studs.
Regardless of type, finish material must be backed
firmly at all nailing pints, corners, and seams. Where
you cover existing finish surfaces or otherwise alter the
thickness of walls, it’s usually necessary to build up
existing trim. Figure 5-13 shows how this might be done
Figure 5-13.—Building up an intertor window casing.
5-11